
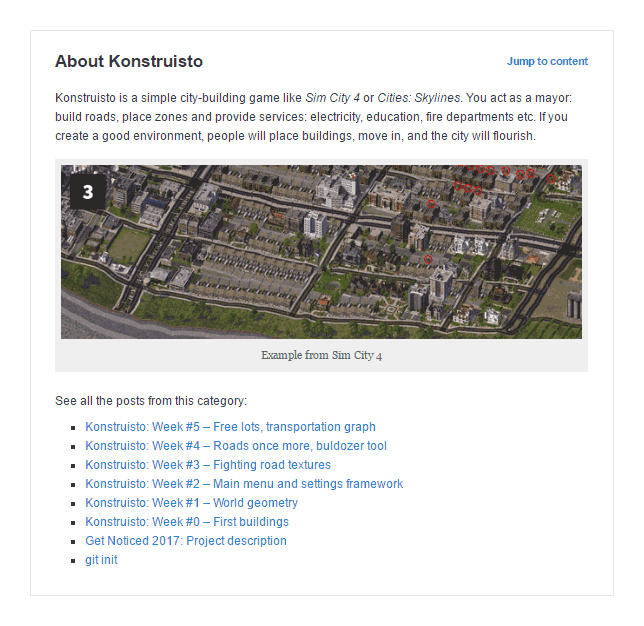
I post progress summary for Konstruisto on Fridays, but not everybody knows what this project is. Every week I have to paste the same formula at the top. It shows in the RSS feed, it generates pingbacks to my articles and is unhandy in many other ways.
I thought I would make a WordPress plugin to solve these problems. It was a great opportunity to refresh my knowledge about the system – I hadn’t used WordPress for three years!
Surprisingly, it took me only 5 hours to do everything from scratch, but I wanted to leave an article I can go back to as a reference. You can get the plugin from my GitHub repository: https://github.com/kantoniak/kantoniak-project-description/.
Update: Plugin is already available here: https://wordpress.org/plugins/project-description/.To install it from the dashboard, go to Plugins/Add New, change search criteria to Author and look for kantoniak.
Features
I wanted a plugin which:
- Shows description before the article. Description can be any content (e.g. images)
- Does not change feed contents, so people see actual text from the beginning
- Has a list of entries from the category, so people can quickly switch between articles. Also, it allows the reader to see the project progress just by glancing the titles.
Go to Konstruisto category to see it in action.
Plugin setup
WordPress stores plugins in the directory wp-content/plugins/. Think of unique slug (an alphanumerical identifier) and create a folder with this name. Then create a PHP file <slug>.php – it will be the entry point for this extension:
<?php
/*
Plugin Name: Project Description
Plugin URI: http://antoniak.in/
Description: This plugin adds project description at the top of the article.
Version: 0.0.0
Author: Krzysztof Antoniak
Author URI: http://antoniak.in/
License: GNU General Public License, version 3.0 (GPL-3.0)
 */
WordPress hooks
The way extensions work is to wait for an event and then execute code. There are two types of hooks: action, to add custom features to the project, and filters, to modify data before it goes to the next filter or the renderer.
Inside the hooks, there are various functions we call. Some of them depend on the global state, e.g. we cannot call the_title(); unless post data is setup (e.g. we are in the middle of rendering post page).
Render before article
We listen for hook the_content to prepend post with the box:
add_filter('the_content', 'runFilter');

function runFilter($content) {
  if (!is_single() || !in_the_loop() || !is_main_query() || !in_category((int) $categoryWeWant)) {
      return $content;
  }

  return getModified($content);
}
This filter will run for every query asking for content. We have to manually filter out ( ) unwanted cases:
is_single()checks if it is a post page, not an archive or anything elsein_the_loop()checks if we are rendering article part of the site (see The Loop)is_main_query()is to check if we use main WPQueryin_category()checks for the category of the post, it depends on global state
Render on category page
This one is a bit trickier since there is no hook triggered just before rendering articles. I decided to change category description on the fly, as many templates render it just after the title.
add_filter('category_description', 'onCategoryDescription');

function onCategoryDescription($content) {
 if (!is_category((int) $categoryWeWant)) {
 return $content;
 }

 return getCustomContent();
}
Further filters will receive the content we returned. Possible problem is that we return HTML code whereas Category description in WordPress admin is a regular chunk of text.
Fetch posts from category
Wonderful get_posts() solves the problem for us. Worth noticing, it returns only 5 posts by default. It has a lot of options.
$posts = get_posts(array(
 'category' => (int) $categoryWeWant,
 'numberposts' => -1
));
$someData = [];
foreach ($posts as $p) {
 $someData[] = array(
 'title' => get_the_title($p),
 'permalink' => get_permalink($p)
 );
}
Save and read options
Options system is really easy: there are two methods to save and retrieve the value. Please note that scalar values are returned as strings:
update_option($name, $value);
get_option($name, $default);
Create options page
There is an action admin_menu for registering new pages. We call add_options_page() giving a callback to a handler function.
add_action('admin_menu', 'setupAdminMenu');

function setupAdminMenu() {
 add_options_page('Project description', 'Project description', 'edit_plugins', 'project-description', 'handleSettingsPage');
}

function handleSettingsPage() {
 if (isset($_POST['submitted'])) {
  // Update options...
 }

 include('template-settings.php');
}
WordPress suggest using Settings API to handle options, but after the article on WPShout and a few minutes of checking myself, I decided just to render plain HTML since I needed only a few fields.
Add custom CSS
Just wait for the wp_enqueue_scripts hook and give the URL to your CSS file:
add_action('wp_enqueue_scripts', 'addStylesheet');

function addStylesheet() {
 wp_enqueue_style('plugin-slug', plugins_url('plugin-slug/css/style.css'));
}
Styles in WordPress have handles, it’s a good practice to use something unique like plugin slug name.
Update: For admin page CSS, use the admin_head: hook:
add_action('admin_head', 'addAdminStylesheet');
Summary
That’s all you need to write a WordPress plugin, the rest is a simple PHP code. Check the main file of the plugin to see how to pass method callbacks etc.