Selenium is a testing tool used in web development. It emulates user behavior inside a web browser, right in front of you. It can interact with links, move the mouse and so on. As an example, we will make a script that draws a simple shape in Sketchpad. Selenium has many integrations; I will use Python and Google Chrome driver. And everything under 60 lines of code!
Setup
Install google-chrome and download driver (downloads page). The driver executable should be put in PATH. Now install Selenium:
pip install selenium
Now we have to setup drawing app:
- The script needs to open browser and navigate to the page.
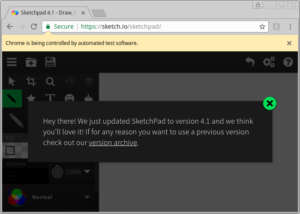
- When browser loads the app, a welcome popup appears. We have to close it by clicking on the X icon.
- Then we move to drawing area and emulate mouse drag with left button pressed.
Browser setup
A typical boilerplate to open the browser. driver.get loads the page:
driver = webdriver.Chrome()
driver.set_window_size(700, 500)
driver.set_window_position(50, 50)
driver.get(page)
// ...
driver.quit()
Interaction with page elements
We don’t know whether the page is already loaded or not. Also, elements can appear on the page dynamically, e.g. when Javascript adds new content and page is re-rendered. We wait until element becomes available. Then we find it once again and send click event:
WebDriverWait(driver, 10).until(
    EC.presence_of_element_located((By.CSS_SELECTOR, '#alertify .icon-close')))
driver.find_element_by_css_selector('#alertify .icon-close').click()
driver.find_elements_by_css_selector returns a list of WebElements. You can use them to get link href attribute etc.
Drawing stuff
Sketchpad tries to smoothen the path we draw with the mouse, so every line has to be drawn separately. We create a chain of actions like moving the mouse, clicking button. Then we call perform to run the queue:
action = ActionChains(driver)
action.move_to_element(driver.find_element_by_tag_name('sketch-document'))
action.click_and_hold()
action.move_by_offset(10, 10)
action.release()
action.perform()
Note that real cursor is enabled and you can move it during the test. The script contains a loop to draw multiple lines.
Done!
A few imports and sleeps and we have a working script:
The preview video slows down, but it’s rather a particular problem with drawing (Sketchpad uses canvas I guess).
Summary
This simple example shows how to interact with DOM elements and simulate the mouse. It’s sufficient to prepare a vast array of tests thanks to python support. Try to make your shape 😉